Outlook에서 더 이상 SMTP를 일반 베이직 인증으로 지원하지 않는 문제가 발생했습니다.
Auth 2.0을 통한 로그인이 필수로 되었고 이를 위해 Access 토큰을 발급 받아야 합니다.
먼저는 Microsoft 계정이 기본 준비물입니다.
Microsoft Azure Admin center로 접속하여 어플리케이션을 등록해야합니다.
Microsoft Entra admin center
aad.portal.azure.com
앱 등록 사이드 탭으로 이동 > 새 등록

다음과 같이 어플리케이션 세부 설정 후 등록하는 과정을 거칩니다.
새로이 만들어진 어플리케이션을 클릭해보면
Client ID, 테넌트 ID가 생성된 것을 확인할 수 있습니다.
이 두개는 API 요청에 필요한 파라미터임으로 뒤에서 활용됩니다.
Microsoft에서는 Auth 2.0 인증을 다양한 방법으로 할 수 있는데요
1. Common Auth Code Grant
일반적인 OAuth 2.0, Auth code grant는 미리 등록해놓은
Application Code 및 권한을 파라미터 값으로 넣어 인증서버에 요청합니다.
이 때 redirectURI를 파라미터로 같이 필수로 등록해놓았기 때문에 로그인 후에 토큰을 넘겨줄 URI 등록이 필수적입니다.
하지만 임베디드 혹은 IOT 장비 특성상 고정된 도메인이 아닌 I.P Address의 주소를 매 번 등록하기도 어렵기에 다른 인증 방법이 필요합니다.
2. Device Code Flow
Device Code Flow는 입력이 없는 장치들을 위한 OAuth 2.0 인증 방식으로 redirectURI 파라미터가 필수가 아닙니다.
백엔드에서 OAuth 2.0 서버로 요청하여 인증 코드를 받아와 사용자가 해당 플랫폼에서 전달한 URI로 접속해서
인증코드 입력 및 로그인을 진행하는 방식으로 Access Token을 받아오는 방식입니다.
1번은 흔히 우리가 아는 구글, 카카오 로그인과 같은 방식이며
2번은 OTP(One Time Password)와 유사한 형식이라 생각하면 이해하기 쉽습니다.
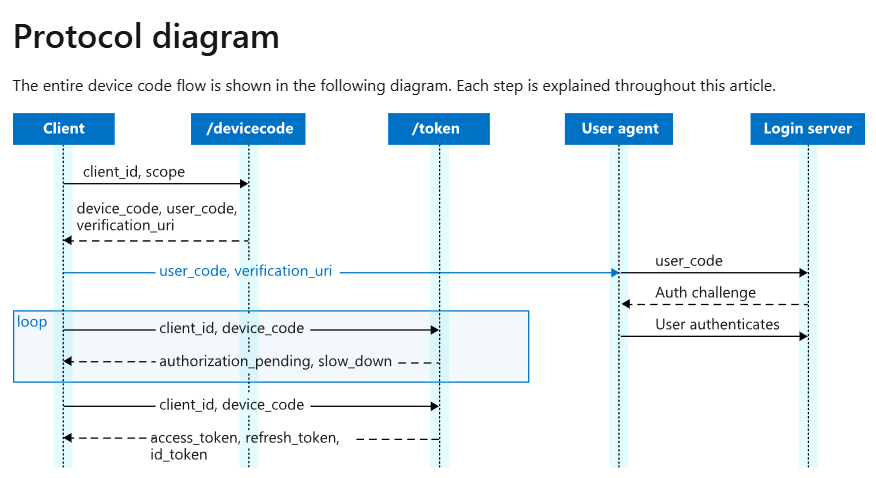
3. Microsoft Protocol Diagram (Device Code Flow)
OAuth 2.0 device authorization grant - Microsoft identity platform
Sign in users without a browser. Build embedded and browser-less authentication flows using the device authorization grant.
learn.microsoft.com
1. 어플리케이션을 만들면서 받은 client_id 및 tenant_id를 통해 인증서버에 API요청을 통해 device code를 받습니다.
2. 이 상태에서 클라이언트는 폴링 상태로 들어가며 사용자가 특정 verification_uri에 접속해 user_code(위에서 언급한 OTP)를 인증할 때 까지 기다립니다.
3. 사용자가 해당 Login Server에 로그인하여 인증코드를 통해 해당 어플리케이션이 요청하는 권한에 대한 승인 여부를 확인 합니다.
4. 폴링하고 있던 디바이스에 엑세스 토큰을 발급합니다.
5. 발급 받은 엑세스 토큰을 통해 해당 사용자에 대한 정보와 권한을 획득합니다.
다음은 실제 백엔드에서 Device Code Flow 방식으로
SMTP 서비스에 접근하기 위한 엑세스 토큰을 받아 봅시다.
1. NodeJS
const axios = require('axios');

// 애플리케이션 설정
const tenantId = "tenanatID"; // Azure AD 테넌트 ID
const clientId = "clientID"; // 애플리케이션의 클라이언트 ID
const scope = "User.Read"; // 요청할 권한 범위

// Azure AD 엔드포인트
const deviceCodeUrl = `https://login.microsoftonline.com/${tenantId}/oauth2/v2.0/devicecode`;
const tokenUrl = `https://login.microsoftonline.com/${tenantId}/oauth2/v2.0/token`;

async function authenticateWithDeviceCode() {
  try {
    // 1. 디바이스 코드 요청
    const deviceCodeResponse = await axios.post(deviceCodeUrl, new URLSearchParams({
      client_id: clientId,
      scope: scope,
    }));
    const deviceCodeData = deviceCodeResponse.data;
    console.log("1. 사용자에게 제공된 링크와 코드를 안내합니다:");
    console.log(deviceCodeData.message); // 사용자에게 출력할 메시지
    console.log(deviceCodeData.device_code); // 디바이스 코드 출력
    // 2. 폴링하여 토큰 요청
    let accessToken = null;
    while (!accessToken) {
      console.log("사용자 인증 대기 중...");
      await new Promise((resolve) => setTimeout(resolve, deviceCodeData.interval * 1000)); // interval 초 대기

      try {
        const tokenResponse = await axios.post(tokenUrl, new URLSearchParams({
          client_id: clientId,
          grant_type: "urn:ietf:params:oauth:grant-type:device_code",
          device_code: deviceCodeData.device_code,
        }));
        accessToken = tokenResponse.data.access_token; // 액세스 토큰 저장
        console.log("✅ 인증 성공! 액세스 토큰을 받았습니다.");
        console.log("Access Token:", accessToken); // 액세스 토큰 출력
      } catch (error) {
        if (error.response && error.response.data.error === "authorization_pending") {
          // 사용자 인증 대기 중
          continue;
        } else {
          console.error("❌ 오류 발생:", error.response?.data || error.message);
          break;
        }
      }
    }

    return accessToken; // 인증이 완료된 액세스 토큰 반환
  } catch (error) {
    console.error("❌ 디바이스 코드 요청 중 오류 발생:", error.message);
  }
}

// 함수 실행
authenticateWithDeviceCode();
다음과 같이 API 요청을 할 경우 사용자가 접속할 링크와 인증코드를 받아오는 것 확인 가능합니다.

다음과 같이 인증코드를 인증하면

해당 어플리케이션이 식별되며 Microsoft 계정으로 로그인할 수 있는 창이 뜹니다.
로그인을 완료할 경우

로그인 완료창이 나오면서 클라이언트에서 엑세스 토큰을 발급받은 것을 확인할 수 있습니다.

2. C언어
#include <stdio.h>
#include <stdlib.h>
#include <string.h>
#include <curl/curl.h>
#include <jansson.h>
#include <unistd.h> // sleep() 사용

// Azure 설정
#define CLIENT_ID "a"
#define TENANT_ID "b"
#define SCOPE "User.Read" // 요청할 권한 범위

// Azure Endpoints
#define DEVICE_CODE_URL "https://login.microsoftonline.com/" TENANT_ID "/oauth2/v2.0/devicecode"
#define TOKEN_URL "https://login.microsoftonline.com/" TENANT_ID "/oauth2/v2.0/token"

// 메모리 구조체
struct MemoryStruct {
    char *memory;
    size_t size;
};

// libcurl의 콜백 함수 (HTTP 응답을 메모리에 저장)
static size_t WriteMemoryCallback(void *contents, size_t size, size_t nmemb, void *userp) {
    size_t realSize = size * nmemb;
    struct MemoryStruct *mem = (struct MemoryStruct *)userp;

    char *ptr = realloc(mem->memory, mem->size + realSize + 1);
    if (ptr == NULL) {
        printf("메모리가 부족합니다.\n");
        return 0;
    }

    mem->memory = ptr;
    memcpy(&(mem->memory[mem->size]), contents, realSize);
    mem->size += realSize;
    mem->memory[mem->size] = 0;

    return realSize;
}

// POST 요청 함수
char *make_post_request(const char *url, const char *post_fields) {
    CURL *curl;
    CURLcode res;

    struct MemoryStruct chunk;
    chunk.memory = malloc(1);
    chunk.size = 0;

    curl = curl_easy_init();
    if (curl) {
        struct curl_slist *headers = NULL;
        headers = curl_slist_append(headers, "Content-Type: application/x-www-form-urlencoded");

        curl_easy_setopt(curl, CURLOPT_URL, url);
        curl_easy_setopt(curl, CURLOPT_POSTFIELDS, post_fields);
        curl_easy_setopt(curl, CURLOPT_WRITEFUNCTION, WriteMemoryCallback);
        curl_easy_setopt(curl, CURLOPT_WRITEDATA, (void *)&chunk);
        curl_easy_setopt(curl, CURLOPT_HTTPHEADER, headers);

        res = curl_easy_perform(curl);
        if (res != CURLE_OK) {
            fprintf(stderr, "curl_easy_perform() 실패: %s\n", curl_easy_strerror(res));
            free(chunk.memory);
            curl_easy_cleanup(curl);
            curl_slist_free_all(headers);
            return NULL;
        }

        curl_easy_cleanup(curl);
        curl_slist_free_all(headers);
    }
    return chunk.memory;
}

int main() {
    char post_fields[512];
    snprintf(post_fields, sizeof(post_fields), "client_id=%s&scope=%s", CLIENT_ID, SCOPE);
    char *curl = curl_easy_init();
    char *encoded_post_fileds = curl_easy_escape(curl, post_fields, 0);
    // 1. 디바이스 코드 요청
    printf("디바이스 코드 요청 중...\n");
    char *response = make_post_request(DEVICE_CODE_URL, post_fields);
    printf("kow401 test: %s\n", encoded_post_fileds);
    if (!response) {
        fprintf(stderr, "디바이스 코드 요청 실패\n");
        return 1;
    }
    printf("디바이스 코드 응답: %s\n", response); // 응답 내용 출력

    // JSON 파싱
    json_t *root;
    json_error_t error;
    root = json_loads(response, 0, &error);
    free(response);
    if (!root) {
        fprintf(stderr, "JSON 파싱 오류: %s\n", error.text);
        return 1;
    }
    char post_fields2[2048];
    // 디바이스 코드 정보 추출
    char *device_code = json_string_value(json_object_get(root, "device_code"));
    printf("kow401 test device code is: %s\n", device_code);
    const char *user_code = json_string_value(json_object_get(root, "user_code"));
    const char *verification_uri = json_string_value(json_object_get(root, "verification_uri"));
    int interval = json_integer_value(json_object_get(root, "interval"));

    if (!device_code || !user_code || !verification_uri) {
        fprintf(stderr, "디바이스 코드 정보 추출 실패\n");
        json_decref(root);
        return 1;
    }

    printf("사용자는 %s 를 방문하여 다음 코드를 입력하세요: %s\n", verification_uri, user_code);
    json_decref(root);
    printf("device code is wrong? %s\n", device_code);
    snprintf(post_fields2, sizeof(post_fields2),
            "client_id=%s&grant_type=urn:ietf:params:oauth:grant-type:device_code&device_code=%s",
            CLIENT_ID, device_code);
    // 2. 폴링하여 액세스 토큰 요청
    while (1) {
        printf("액세스 토큰 요청 중...\n");
        sleep(interval); // 지정된 간격 동안 대기


        printf("kow401 test : post_fileds test %s\n", post_fields2);
        response = make_post_request(TOKEN_URL, post_fields2);
        if (!response) {
            fprintf(stderr, "토큰 요청 실패\n");
            return 1;
        }

        root = json_loads(response, 0, &error);
        free(response);
        if (!root) {
            fprintf(stderr, "JSON 파싱 오류: %s\n", error.text);
            return 1;
        }

        if (json_object_get(root, "access_token")) {
            const char *access_token = json_string_value(json_object_get(root, "access_token"));
            printf("✅ 인증 성공! 액세스 토큰: %s\n", access_token);
            json_decref(root);
            break;
        } else if (strcmp(json_string_value(json_object_get(root, "error")), "authorization_pending") == 0) {
            json_decref(root);
            continue;
        } else {
            fprintf(stderr, "오류 발생: %s\n", json_string_value(json_object_get(root, "error_description")));
            json_decref(root);
            return 1;
        }
    }

    return 0;
}
임베디드 환경은 대부분 C언어로 작성되기에 C언어로도 테스트 해봤습니다.
여기까지 엑세스 토큰을 발급 받아봤는데요!
다음 시간에는 이 엑세스 토큰을 활용하여 SMTP 서버를 통해 메일을 보내보겠습니다
'Web' 카테고리의 다른 글
| IEMode, 개발자모드로 디버깅하는 법 (0) | 2024.08.06 |
|---|---|
| Edge, IEMode 설정, Internet Explorer (0) | 2024.08.06 |
| Input Tag가 Click, Focus 되지 않을 때 (0) | 2024.07.22 |
| JWT, NodeJS와 React를 통해 구현해보기 (2) (0) | 2024.07.01 |
| JWT, NodeJS와 React를 통해 구현해보기 (1) (0) | 2024.06.28 |


